Over the weekend I was recognized by the SCA for my study of period fencing, particularly for my work with the longsword of the Anonimo Bolognese. On top of that, Facebook reminded me today that it’s my four-year anniversary of studying longsword, so I decided to try something new. I had picked up a copy of the Anonimo Riccardiano a couple years back, realized I’d have to learn the names for a whole new set of guards, and promptly put it back down. Now that I’m a bit deeper into my studies, I was able to take in the guard names fairly quickly and got to working on the meat of the text.
For some context, the Anonimo Riccardiano: Trattato di Scherma is an anonymous fencing treatise written sometime during the second half of the sixteenth century in Northern Italy, with the text currently residing in Florence. Although it shares much of its terminology with the Bolognese masters, the terms it uses are distinct enough to the point that I could easily label it as separate from that tradition. While the majority of the text focuses in on techniques for the sword in one hand and its companions (although interestingly not with buckler), it is one of the few Italian treatises from the latter half of the sixteenth century that devotes a good amount time to the sword in two hands. For those who might be interested the others are Marc’Antonio Pagano (1553) who’s work shows us an example of the Southern Italian tradition as opposed to the other more Northern authors, Giacimo di Grassi (1570), and Giovan Antonio Lovino (c. 1580) who only shows us a total of four plays but interestingly splits them up between the hand and a half sword and the sword in two hands. Unfortunately I have yet to study any of these in any depth and am thus relegated to using the Bolognese system as my jumping off point for the moment.
Overall, the Riccardiano follows the general trend we see in the Bolognese texts over time. While those earlier in the sixteenth century devoted an equal amount of time to wide larga (wide/unconstrained) and stretta (narrow/constrained) play, as you move into the 1570’s and look at dall’Agocchie, the focus switches almost entirely to stretta play. Even though this text gives us a couple guards with the point starting out of presence, very few of the plays described include the large sweeping actions we see in the earlier treatises.
One of the things I found really helpful with this text in regards to how I conceive of fencing was its usage of mezza coperta (half cover) where the hands are low and the point is high, and tutta coperta (full cover) where the hands are high and the point hangs low. Instead of spending as much time worrying whether you were covering the inside line with cinghare porta di ferro stretta or porta di ferro alta, this author seems a lot more concerned with whether you’ve closed off part of your body or all of your body. Thinking of things as just low vs high, inside vs outside, and left foot vs right foot can often help a lot more in the middle of a fight than trying to figure out which specific guard you’re in.
Something else that really stood out to me was how accessible the text was for folks coming from a primarily rapier background. A lot of the plays in this chapter are literally just feint a thrust on the line you’re currently on, as they go to parry perform a disengage, and then stab them on the other side. While we do see this play pop up occasionally in the Bolognese treatises, especially dall’Agocchie, seeing it used so prevalently really helps to illuminate how the focus of Italian fencing slowly changed throughout the century.
Comparing this chapter alone to those in the Bolognese texts, I’d say that the first part reads more like Marozzo’s earlier assalti with the fight only being shown from one side and with each numbered play being just another step of a much larger fight. As the chapter progresses, though, it starts to read a lot more like Marozzo’s later assalti or the Anonimo Bolognese’s chapter on the sword in two hands, with it just being a few techniques shown at a time followed by their counter (and occasionally the counter to that). It’s also interesting to note that there’s just the one chapter on the weapon as opposed to splitting it up into different sections based off of stretta vs. larga or inside vs. outside. That said, much like the Anonimo Bolognese, the author labels this the first chapter on the weapon, but never delivers a second.
Overall, I think this going to be a really interesting treaty to study and I’d say the techniques presented will likely be easier to translate into our modern tournament combat than the longer showpieces we often see in some of the earlier treatises. Also, I must say that I do appreciate the author ending the chapter on straight up punching the other guy in the face when he tries to grab your sword. Anyhow, I’m sure I’ll be putting out some more content as I dive further into this book. In the meantime, feel free to pick up a copy for yourself:
Often times in fencing we focus on how to do something. This is all well and good, but often times we overlook how to counter those very things, a skill that I for one would say is even more important. There is a reason that Giganti, the greatest writer in the history of fencing, generally teaches us how to counter a technique before he shows us how to perform it.[1] You can get away with only having a couple good attacks, but you have to know how to defend against everything if you want to make it out alive.
For anyone looking at a refresher on feints, I would strongly encourage you read the following:
Now with that out of the way, let’s learn how to stop our friends from faking us out when all we want from them is a little bit of commitment.
When someone throws a feint at you there’s two things you can do with your sword and two things you can do with your feet. Well technically there’s three, but we’ll get back to that later. With your blade you can either reestablish the line you’re already on, or you can move to a new one and gain the advantage there. Depending on how you view things or what vocabulary you’re used to, reestablishing the line could be conceived as either a parry or as a counter-find (I tend to go with the latter). You might extend your blade forwards in order to push through your opponent’s guard or you might have pulled it back in order to get your forte closer to their debole, but what matters for the definition here is that your sword has stayed on its initial line. Alternatively, you can go around. Generally speaking this is going to be some sort of cavazione (disengage), but I’m not going to limit it to just that.
For your feet, things are even more straightforward. You can either move forwards, or you can move back. If you want you could add in an angled step, but at the end of the day you’re either closing distance or you’re moving away.
This leaves us with four possibilities. 1) You reassert the line (counter-find) while you advance in to the feint. 2) You reassert the line while stepping away from your opponent. 3) You go around their sword (cavazione) while moving in. 4) You go around their sword while stepping back. 1,2, and 4 all work as valid options. #3 is theoretically possible, but by moving in you inherently give yourself more of their sword to go around, making your disengage take longer. For 2 and 4, the ones where you move away, I’d add in that you’re going to want to take an extra-large step. If your reaction is to parry while taking a small to normal sized step backwards, you’ve likely done precisely what your opponent has expected and landed yourself in to their obedience. If you take an extra-large step back you’ve made it so that their next step won’t be the one that hits you and given yourself back some precious time. On the flipside, by going with option 1 you’ve now essentially stolen time from your opponent by making their disengage inherently larger.
Now that we’ve gotten the mechanics down, it’s time to look at tempo.[2] Depending on which of the two types of feints your opponent employs, one of you or the other get to dictate in what tempo the feint is performed. If they already have the line and go for the feint-direct, they are the ones who are in control of when the feint happens. It’ll generally be while you’re already moving, but if they have the line and the measure is close enough they could theoretically fire whenever they wanted to. If it’s you who has the line and they’re forced to go with the feint-disengage (feinting by performing a disengage), then it’s you who controls the tempo. More than likely they’re going to wait to fire until you move to step towards them. Now you never know which step it is they’re going to fire down, but if they wait too long you should have already run them down thus providing a convenient solution to their indecision.
Finally we return the option I have intentionally chose not to mention until now as it muddies the waters a bit. This is something we see often suggested in the Anonimo Bolognese.[3] Generally when an opponent feints a blow at us, his suggestion? Just ignore it.
Now I would note that this last option only works when they throw a bad feint. You can try and seize the opportunity and attempt to strike your opponent in contratempo, but generally speaking I just end up saving my energy for when it really matters. Just remember, if their “feint” isn’t a threat, no reason to pay it any attention. That and just straight up ignoring your opponent’s antics is just a sweet power move.
Anyhow, clear things up for anyone who might have found themselves mystified by the whole topic. If you have any additional thoughts on how to get students comfortable with countering feints, feel free to drop them below.
How to marry a sword to a dagger can be quite the daunting task. You’ve been using a single sword for awhile now and decided to pick up something in your second hand, but you’re not quite sure what to do with it. You thought you might only have to figure out how to translate the guards of the sword to being guards of the dagger, but you’ve realized that putting the two together has far more than doubled the possible combinations of either one on their own. Maybe you even tried looking at the books, but found them to be a bit overwhelming and either providing way to much detail or not enough. There’s good news though, this article is here to make your life easy.
Now flipping through any of the texts, we see that there’s a wide possibility of ways to put these two tools together. In his first few plates, right after his main theory sections, Capoferro shows us at least six different sword and dagger guards. However, they’re put too early in the book to be much use to anyone at the beginning of their journey and there isn’t any context given in those first pages as to how these might be used.
Capoferro, plate 2, demonstrating quarta and prima.
Capoferro, plate 3, demonstrating seconda and sesta.
Capoferro, plate 4, demonstrating terza and quinta.
Flipping through Fabris we see that he blows Capoferro out of the water, giving us more ways to put the two together than I’m willing to count to.[1] The amount of detail he gives us is hardly lacking, but it’s presented in a way that can easily be overwhelming to folks earlier on in their fencing careers.
Fabris, plate 65.
Fabris, plate 157.
Thankfully for you, dear reader, our very own Nicoletto Giganti is here to help. In his first book (1606) after he wraps up showing us how to feint with the single sword as well as how to successfully fight single against a sword and dagger, he loops back around to show us how to properly parry with a dagger. Like Agrippa’s description of the guards of the sword, Giganti narrows it all down to four possibilities.
If our opponent moves to strike us on the high-inside line, we solve the problem by keeping the pommels of our sword and dagger close together and pointing the tip into our upper-left quadrant (upper-right if you’re a lefty) to answer our opponent’s sword.
Giganti, plate 21.
If instead our opponent moves to strike our low-inside line, we still keep our pommels close together, but instead point the tip of our dagger down to cover our lower-left quadrant (lower-right if you’re a lefty).
Giganti, plate 22.
Next, he shows us how to defend ourselves if our opponent moves to strike our low-outside line. In this one instance, instead of keeping our pommels together, he instead shows us keeping our blades together with the point of the dagger aimed at the blade of our sword.
Giganti, plate 23.
As a note, the picture here shows him performing the technique with his sword in seconda (true edge pointing out). That said, you can perform the same exact technique with the dagger even if you thrust with your sword in prima (true edge facing up).
Giganti book II, page 56.
Finally, if our opponent moves to strike into our high outside line, Giganti shows us once again holding our pommels close together, but this time with our dagger pointing into our upper-right quadrant (upper-left if you’re a lefty).
Giganti, plate 24.
Now that we’ve done our reading, it’s time to put it all together. All of these possibilities boil down to two simple questions. First, do we point our dagger up (plates 21 & 24) or down (plates 22 & 23)? And do we have our pommels together (plates 21, 22, & 24) or our blades together (plate 23)? That’s it. Keep your sword and together to close off the centerline, push your dagger into the quadrant of their sword, and strike with the point of your rapier. Two hands, two blades, and only four total options.
Now clearly there’s more things you can do with a rapier and dagger besides these four techniques.[2] However, you tend not to have much time to think when you’re in the middle of a fight and there’s very few situations these four techniques won’t be able to help you with. So hopefully this little schema helps clear things up for you and aids you on your journey.
Works Cited
Capoferro, R. (2011). Ridolfo Capoferro’s the art and practice of fencing: A practical translation for the modern swordsman. (T. Leoni, Trans.). Freelance Academy Press.
Fabris, S. (2005). Art of dueling: Salvator Fabris’ Rapier fencing treatise of 1606. (T. Leoni, Trans.). Chivalry Bookshelf.
Giganti, N. (2010). Venetian rapier: The school, or Salle: Nicoletto Giganti’s 1606 rapier fencing curriculum: With new introduction, complete text translation, and original illustrations. (T. Leoni, Trans.). Freelance Academy Press.
Giganti, N. (2013). The ‘lost’ second book of Nicoletto Giganti (1608): A Rapier fencing treatise rediscovered and translated. (P. Terminello & J. Pendragon, Trans.). Fox Spirit Books.
[1] If you’re willing, please comment below with the number of unique sword and dagger guards Fabris shows us.
[2] See Giganti plate 33, Capoferro’s guards of quinta and sesta, all of Fabris.
This is a drill I created awhile back that I’ve found to be incredibly helpful to teach a few key concepts that are really necessary for folks to make that jump from intermediate to advanced fencers. I’m certain other people have created this drill on their own using their own descriptions, but this is what I personally have found works to communicate these ideas to a fair number of fencers.
To begin, in drilling we often practice as if both fencers are making ideal choices at every turn. One person might do one thing and if the other person executes a certain technique the proper way, the first person has to change and do something else. Quite often, though, even the top end fencers are less than perfect. This drill helps folks to identify when that is happening and what they can do to exploit it.
Walking in, both fencers should have a good idea of how to find an opponent’s sword, proceed to gain their blade, and execute a proper lunge. None of this has to be perfect, but if that foundation isn’t there, this drill won’t be of any use. We should always strive to build off of a fundamental conception of proper mechanics before we move on to anything fancier.
So here’s the drill itself:
Fencer A finds their opponent’s sword, steps in, leans forwards to gain their blade, and then steps forwards to lunge.
Fencer B, upon being attacked, moves to parry.
If Fencer B performed a good and proper parry, Fencer A disengages and strikes to the other side.
Alternatively, if Fencer B performed a shitty parry, Fencer A should push on through and strike along their initial line without disengaging.
How do you know if it’s a proper parry or a shitty one? Simple. Did you get hit? As long as Fencer A throws a committed attack and doesn’t do anything fancy like try and yield their blade, their attack should go straight through any shitty parry. As well, if Fencer B performs their parry correctly, Fencer A’s lunge should end up off-target resulting in Fencer B standing there untouched.
The overarching point here is to teach Fencer A that just because their blade has been acted upon, doesn’t mean their opponent now has the advantage. Sometimes in a fight people make the wrong move. More often, they go to make the right move but execute it poorly. So if you have control of a line and your opponent fails to regain control or threaten a different line, you have no reason why you shouldn’t continue along your original plan as the line is still yours.
The point in a student’s learning I typically introduce this drill is when they start to have good mechanics, but don’t yet trust them. Sometimes this manifests as students coming in, but then backing out before they have the chance to strike. Other times it’s when they come in but consistently throw their shots short of the target. Alternatively, the fighter might consciously know they have the ability to control their opponent’s blade, but are worried that it’s going to slip out somehow, but they’re just not sure how or when. What this drill does is get that feeling of, “Now you have their sword. Go!” into someone’s bones, giving them a tactile sense of when they do and don’t have the line secured.
Hopefully this helps you and those around you get a better understanding of when is the right time to strike as well works as a way to help make that transition from mid to high level fighter all just a tad bit smoother.
Appendix: Turning it Up a Notch
Once you have the fundamental drill down, here’s a few dials you can play with to help folks get an even deeper understanding of the subject.
So far we have given two options to Fencer B. Either parry well, or parry poorly. To mix things up a bit, feel free to add in a third option of not parrying at all. You’d be surprised how often people will just stand there, frozen in place, after you make your initial move. For Fencer A the response here should be the same as with the shitty parry; just stab them down the line you’re already on. Even though mechanically an opponent doing nothing is the simplest thing to deal with, psychologically it’s often the hardest. We’re so hardwired to think that after every time we move a piece on the board our opponent is going to do the same, so it throws people for a loop when their opponent just does nothing. Thankfully this is a scenario we can train for by just adding it in as an option to all of our choice-based drills once students have figured out the initial version.
The second thing you can play with is when Fencer B performs their parry. Remember that Fencer A’s attack comes to us in three parts: the find, the gain, and the lunge. This means that there’s three different points in time when Fencer B can decide to act (or not). They can move to parry the instant their sword is covered, they can move as their opponent is leaning in and taking control of their blade, or they can parry as their opponent moves their foot to lunge forwards. We often conceptualize this all being one continuous motion, but you’d be surprised by how much changing when you parry can affect things. People are generally used to their opponents moving to parry at only one part of the process, so changing when you act can really make a sizeable difference.
Finally, remember that this can be applied to any strike that goes down straight down a line and isn’t limited to one-handed swords. Whether it’s a thrust from a spear, a cut from a longsword, or a punch from a closed fist, the drill will remain essentially the same. So, if you have a student studying multiple styles, feel free to run it through with them using a wide variety of tools.
Anyhow, hope this was all useful for you. Feel free to take this drill and make it your own. I look forwards to seeing what all this can bring you.
I’ve been teaching a lot more longsword at my local practices lately. Someone asked a bit ago about the general beginner’s curriculum I use. I looked at the rough outline I sent them and thought about posting it publicly, but then realized that I’d probably need to provide a bit more detail than just my half page of teacher’s notes and then proceeded to spend the rest of the day listening to jazz, drinking copious amounts of tea, and writing this all up. While the focus of this piece is specifically on longsword, almost all of it can apply to teaching any cut & thrust system from the ground up. Even if what you’re teaching is just thrust centric, there’s still a good bit of it that should prove helpful. Anyhow, enjoy.
Lesson 1: How to Stand With the Sword
This part may seem obvious to anyone who’s been doing this for awhile, but how you stand is vital to how well you fight and more importantly, how happy your joints are. The stance for longsword isn’t anything special, you’ve got your feet shoulder-width apart, one foot in front, and knees bent. The two things to home in on here are making sure that the front knee and toe are both pointing in the direction you want the student to step. If people lunge with their foot turned in, that’s a recipe for knee problems. Fencing is a fun hobby and we are no longer training people to fight for their lives in 40 days. Winning the tournament at the end of the month matters a whole lot less than making sure your students’ joints keep working decades down the line.
The upper body tends to be a bit less straightforward than the lower body here. To ensure students are engaging their lats instead of relying on their rotator cuffs, I have them grab the sword with one hand on the handle and another hand on the blade. From there I have them rest the sword on the back of their neck, which results in them pulling their shoulder blades back and engaging their lats. From there I direct them to keep that engagement as they let go of the blade and move the sword in front of them. Along with knees, shoulders are by and far the most common injury in what we do. This is almost never from people getting hit in the shoulder excessively hard, but is instead because of the person using the sword relying on smaller muscles (i.e. the four rotator cuff muscles) to do the job intended for larger muscle groups.
The next spot I have them focus on is how their hands interact with the sword itself. I know a lot of more old-school places have people focus just on footwork for the first year or so. While I definitely see the upside of that, my thought is that people walking in the door came here to swordfight. So, if I want them to stick around, I’m going to put a sword in their hands on day one. There are multiple valid ways to grip a longsword (Germans and Italians have different defaults here), so without getting too far into that here’s just the fundamental bits I have people focus on to keep their wrists happy. First, I have them line up the bottom corner of their top hand (find your pinkie, go down until you reach the bottom of your hand) with the handle of the sword. This way the bones in their arm lines up with the sword itself as opposed to running beside it, meaning they’re relying more on structure than on hand strength. To note, most people will put their dominant hand on top when using a longsword. However, I do know of a few lefties who prefer to put their right hand on top. Whatever works for them.
After that I have them form a ring with the index finger and thumb of their bottom hand and place it around the pommel. Some people like to hold a little higher on the handle and that’s okay. I just use this as a default as it makes your handle into a longer lever, meaning you have more leverage and can move the blade around more quickly. The more important thing with both hands is that you want the wrists to bend up towards the thumb instead of down towards the pinkie. There are definitely positions that will end up with the wrists being held out straight, but as a general rule of thumb your wrists will get angry if they’re exerting/receiving force while bent down towards the pinkie.
Lesson 2: Mandritto Fendente
Once a student has learned how to stand and hold their sword, I go and teach them their very first cut. Again, footwork is likely more important here, but people who show up to fencing practices tend to want to learn how to swing a sword before they want to relearn how to walk. Even if what you’re teaching is more “correct” it doesn’t much matter if the student doesn’t come back the next week.
Mandritto fendente might seem like a big scary Italian phrase, but all it means is a descending cut that goes from the opponent’s left eye to their right knee, assuming the person throwing the cut is right-handed. If they’re a lefty, it goes the other way. As an instructor, you can feel free to disregard the technical terminology (or use a phrase from a different system). I find it helpful as it’s concise and is used by pretty much everywhere else working out of any of the Italian traditions.
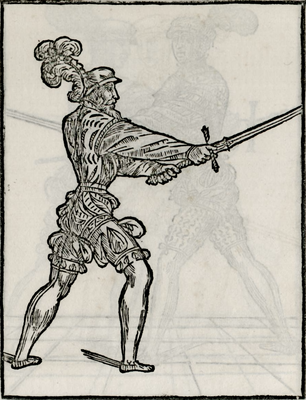
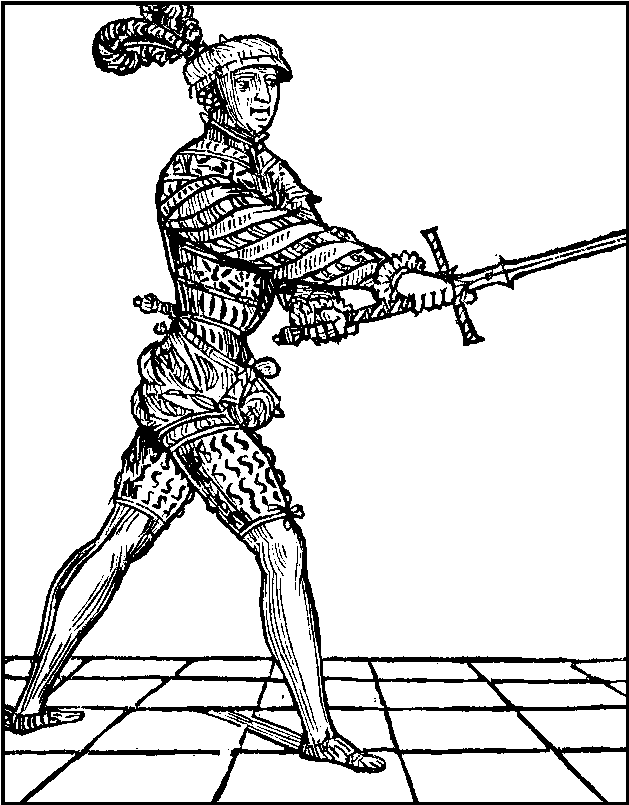
To start with this cut, I tend to start students in guardia di spalla/posta di donna/shouldered vom tag.
Posta di donna
Even though I don’t personally use this guard much while I’m fighting, it serves as a nice relaxed position to start from that makes it easy to focus on all the ins and outs of the mandritto fendente. It’s also the guard that a lot of my first classes on longsword had us start in, so there’s definitely some bias there.
Once I’ve gotten the student in guard and explained what line they’re supposed to be cutting down, I let them go through and throw a dozen or so cuts before I step in with any more details. If they naturally do the right thing, there’s no reason at this stage to explain what all they need to keep their eyes out for when performing this technique. If, however, they don’t magically get it right on the first try, the main thing I focus on in this lesson is the order of operations.
The most important part here is when moving forwards to go sword and then foot. Outside of “be nice to your opponent” this is likely the most fundamental lesson in swordplay. Not only is sword and then foot faster as it better breaks the inertia of a static guard, but it’s also safer for both you and your opponent. Firstly, it keeps your opponent safe by reducing how hard they’re being hit. As it turns out, swords are sharp and pointy. Next time you’re eating a steak (or a Beyond Burger) try poking it with the tip of your knife. It takes incredibly little pressure for that tip to sink right in. Next, try throwing a really hard cut at it. As you’ve probably already guessed, hitting it harder doesn’t make the cut go deeper in. Swords are not hammers, please don’t use them as such. By having the sword move before the foot, you prevent the possibility of winding up before you release your shots. If you look at baseball players, you’ll notice that their foot moves before their bat swings. This is to maximize the amount of force being transferred into the ball. Please, for the love of whatever deity you do or do not pray to, do not swing your longsword like a baseball bat.
In addition to keeping your opponent safe, moving sword and then foot keeps you safer as well. Not only will your opponent be less inclined to hit you like a baseball, but your sword is also clearing the line for you to more safely step in. If you step in and then move your sword, you’re throwing your body closer to your opponent’s without doing anything to prevent them from hitting you.
The last part of this lesson is how to not get hit in the hands when trying to perform the mandritto fendente. The trick here is from the shouldered position to pull your hands in to your chest before pushing the blade out. Not only does this come with the added benefit of hitting with less force, but it also means there isn’t a tempo with your hands being significantly closer to your opponent than your body. If you try and throw this cut like you’re fishing, you are asking your opponent to hit you before you can do anything about it.
After the student starts to get this down, I have them switch which shoulder their sword starts on and then throw a roverso fendente, cutting down towards my right eye towards my left knee. This will almost inevitably seem alien to the student as it’s being thrown from their non-dominant side, but starts readying them to deal with different kinds of blows and also makes it easier for right handed students to drill with left handed ones and vice versa.
Lesson 3: How to Win Against a Cut
Now that your student has a basic understanding of how to deliver a cut, it’s time to learn how to counter one. The first response I like to teach is a simple parry. You throw a mandritto fendente against them and they respond by doing the same ending with the tip of their sword pointing across the line of your’s. The larger lesson here is to solve problems via geometry instead of strength. If they line up their sword correctly, your cut will automatically be diverted away from them, leaving them an open line to attack on.
There are three advantages which determine who wins when two cuts meet. The first is true edge. For those who haven’t heard the phrase before, the true edge is the edge of your sword pointing the same direction as your knuckles. So if you punched someone with your blade, that’s the edge that would be making contact. For anyone who’s ever done test cutting with sharps, you’ll have noticed that lining the edge up just right makes a world of difference, whereas hitting the target harder didn’t really do much to make your cut go any deeper. In addition to the geometry of the blade itself, your hand really wants to use tools along one axis and not the other. You aren’t meant to backhand something with a hammer. If the head of the hammer is pointed correctly, that nail is not going to go in the way you want it to. Same goes for swords, except this time the nail is hitting back. If I can get more of my true edge to line up with more of your flat, I suddenly have a huge mechanical advantage.
The second most important factor is leverage. As it turns out, swords don’t have muscles. Thus, they aren’t able to generate any force on their own. As a result, the closer the crossing of the blades is to your hands/hilt the stronger it is. At the same time, the closer to the tip the crossing is the weaker you become and the longer a lever you hand your opponent. I like to demonstrate this by having the student have the sword straight out and pulling up first with me having one finger on the tip and then again with my finger closer to the hilt.
Lastly, we come to crossing. If I can cross the line of my blade over my opponent’s I’ve aimed the point of my triangle through the flat side of my opponent’s. I’ll often do this by either stepping in or stepping out at an angle. Not only does this gain me the advantage of crossing, but it’s also a nice way to start introducing a little bit of footwork to the student. It’s important to remember here to do this by pointing the tip of your sword across as opposed to trying to push your hilt through. If you go with option B you might think you’re gaining leverage, but you’re effectively collapsing the angle of your sword and handing over the advantage of crossing to your opponent. I often describe this as “punch blocking” as you’re essentially trying to punch your forte into your opponent’s. Learning to point across instead of punch through is right beneath sword and then foot in things that will seem like you suddenly have superpowers when you add them in to your game.
After the student figures out the fundamental parry, I introduce a couple of other options for how to respond to a cut. One of these is what we call a collection. There are a couple ways of doing this, but the main one is by stepping in and striking your opponent’s blade with your quillions by pushing up into guardia di testa (guard of the head).
Guardia di testa
This move ignores the advantages of both true edge and crossing by dumping 100% of your stats into leverage. It’s an especially fun technique for people who are more inclined to fight aggressively (as opposed to natural counter punchers) and is also a great opening for a whole lot of grapples, if that’s something that either your or your student is interested in.
The last option for dealing with a cut is a deflection. This is done by cutting either with the true or false edge into the opponent’s flat, sending their tip flying away from where it can immediately threaten you. There’s a few options for how to do this, but I tend to start students off by having them stand in porto di ferro larga and have them throw a falso manco (a rising false edge cut that aims up into the opponent’s right cheek assuming you have your right hand on top in your grip). I have at least one friend who calls this move the “shoveler” at his school.
Porto di ferro larga
This not only shows the student a new way to deal with cuts but is also a great way to start introducing different kinds of cuts and guards. You’ll notice how I’ve waited until now to start mentioning anything other than variations on one cut and one guard. A lot of places start by having students memorize all of the guards, all of the cuts, and all of the thrusts. While this is helpful later down the line, I find that this can often be more than a bit overwhelming for people just starting out. Plus, if they don’t have any context for how these might be used, the names for everything just won’t stick as well.
Lesson 4: How to Win Against a Thrust
The next lesson I tend to teach is the fundamentals of thrusting. For this I start students off in porto di ferro stretta, with both of us having our true edges pointed slightly towards to inside line.
Porta di ferro stretta
I start by throwing a simple stocatta (rising thrust), just extending my tip forwards, pointed at their centerline, and proceed to step forward. To counter this I have the student perform a smaller version of the same parry we went over for cuts. The one thing to note here is that the order of importance reverses from being true edge, leverage, crossing; to crossing, then leverage, then true edge.
I then repeat the lesson starting in coda longa e stretta doing all the same stuff on the outside line. Some students (particularly left-handed ones) might find the outside line to be easier, but most will take a few minutes to adjust to it.
Coda longa e stretta
Once they’ve learned that simple parry, I teach them how to find, gain, and then attack with a thrust of their own. After that we work on responding to one of my thrusts with one of their own. Just because your opponent is throwing an attack at you, doesn’t necessarily mean that it’s a well formed one. If the student is using proper structure and you as the instructor throw a less than ideal thrust at them, they should be able to counter-find into it and proceed to stab you in the chest.
When they just start to learn how to thrust, they’re likely to be pushing with the hilt of their sword instead of pointing their tip across, so keep an eye out for it. The earlier you can correct this, the better.
Lesson 5: Disengages
Now that the student has a decent understanding of how to meet a blade head on, I move them to how to go around their opponent’s blade. The first bit here is how to disengage an opponent’s blade. I go back first to how to deal with a cut. I have them hold their blade out in front of them as I come in cutting a mandritto fendente. Their goal is to make a mezza volta (half turn) of their blade by cutting over mine and either gaining my blade or immediately striking. If they seem to have decent control of their sword, I’ll have them just hit me with a cut to my mask. If they look like they’re still swinging a bit hard, I’ll just have them cut over to regain my blade and then focus on calibration separately. Ideally in this drill, they should move to disengage their sword before mine makes contact. We then repeat the exercise with me cutting a roverso fendente from the other side.
Next, we move on to thrusts. We both start with our swords extended and I move in to strike the same stocatta we learned earlier. Here I’ll try and end with my sword not too terribly angled up and have the student disengage their tip underneath mine. The thing to remember is that the disengage should be accompanied with a step (either forwards or backwards), be as tight to the opponent’s sword as possible, and should leave you in a position of strength over your opponent’s sword as opposed to just being on the other side of it.
From here we go to building the student’s very first decision tree. I start by stepping in with an attack (either a cut or a thrust). The student then has to decide whether they can counter it by pushing through it, or whether they are forced to go around it. Play around with different levels of intensity here as well as how well structured your attack is. As a note, this bit is perhaps the most fundamental of decision trees in fencing. To a certain degree, every point in a fight comes down to whether it’s safe for you to proceed forwards or if you have to go around.
Once we get that covered, we move to how to counter an opponent’s disengage and make and force it to be as large as possible. There are three ways of doing this. First is through penetration. The closer my point gets to my opponent, the more sword they have to go around, and the larger their disengages become. Next is what we call angulation. If I raise my tip as I lower my hilt, my opponent now has to go around a significantly larger hypotenuse, slowing down their response. Something to note is that the more angled your blade becomes, the shorter the disengage over the top becomes. At the same time, the more you straighten out, the more the disengage underneath becomes the better option. Finally, we take a look at breadth. If I cross over my opponent’s blade instead of remaining straight on, my opponent’s sword now has a longer path to go along the x axis.
I spend some time walking through all of these with the student, letting them test out scenarios incorporating all three to see how they play out in front of them.
Once we’ve covered the more conceptual side of things, I walk them through one of their second tactical decision tree: volta stable vs contracavazione (stable turn vs counter-disengage). I have the student come in to find my sword and respond with a disengage. If I come in and our blades cross past the first palmo (one palm’s width from the tip of their sword), the correct response is to perform a volta stable. All this entails is having them switch from pointing on one line (inside or outside) to having them point their tip the other way and engage their true edge. Once they start to get this on one side, I then switch to the other side and then proceed to alternate between the two.
The other option occurs when I disengage from farther out. At this point, because I have less penetration, the contracavazione becomes the faster option. All this entails is after I disengage, the student performs a disengage of their own.
Lesson 6: Measure.
With most of the fundamental blade mechanics down, I then tend to move students on to a couple fundamental ideas about fencing more generally. The first of these is measure. All measure is, is the distance it takes to strike your opponent. So, if you’re 6’5” and your opponent is 5’4”, your opponent is going to be inside of your measure far sooner than you are going to be inside of theirs. To give the idea a little bit more granularity, I give students five different measures at which actions might occur.
Out of measure – Within a single action you cannot hit your opponent
Misura largissima (widest measure) – You require a passing step (stepping forward with your back foot) to hit your opponent.
Misura larga (wide measure) – You require a step of the front foot in order to hit your opponent with your sword.
Misura stretta (narrow measure) – You can hit your opponent just by leaning forwards, but without having to pick up either of your feet.
Misura strettissima (narrowest measure) – You are so close that you can hit your opponent without even leaning forwards/you can hit them while stepping back.
This is a great place to start introducing more footwork options as well as to create games for your students that let them explore the idea of measure in a fun way that isn’t just 100% unrestricted sparring.
Primo tempo – You strike as your opponent enters measure.
Dui tempi – You require two tempi to respond to their attack and then return with one of your own (think parry-riposte).
Contra tempo – You strike as your opponent moves to strike.
Mezzo tempo – You strike as your opponent prepares to strike/disengages.
At this point I like to have students think of scenarios where each of these might be the case and then drill that specific scenario correcting mechanical issues along the way. If they can’t think of any instances on their own feel free to provide some for them, but if at all possible it’ll generally click easier if the student is the one thinking of examples.
Lesson 8: Cuts & Thrusts
It’s only at this point that I walk students through all the different options for cuts and thrusts. The names for these, as well as the total number described, will be dependent on the particular system you’re using. If you’re at all interested in learning the lingo for Bolognese longsword, feel free to check out these incredibly low-fi videos I made awhile back:
Lesson 9: Guards
This is the last major step on what I like to refer to as Mt. Vocab. While I have used a few technical terms here and there, this is generally the part where you find the most amount of specific vocab words. I know of some schools that try and make this easier by just referring to all the guards by their translated English names. I personally prefer to stick to the original language, but will generally teach them by referring to them first in Italian and then in English for the first while until the student gets familiar with them.
Again, the specific names here are going to depend on what system you’re using. If you’re interested in going with Bolognese, here’s a nicely edited video showing all the guards:
If you want a less comprehensive, worse edited version of the same material, here’s a video I made a few years ago:
I’ve had a few conversations recently how different attributes interact with success in different areas of fencing and I thought it might be helpful for me to explain how they all fit together in some sort of actually thought-out piece instead of trying to remember each of them off the top of my head.
Before we even get into attributes, let’s first take a look at what are widely considered to be the three pillars of fencing. That is, at least for Italian fencing.
Measure – This is perhaps the easiest one to describe. Measure is merely the distance between two fencers. Each fencer has their own offensive measure, from what distance they can successfully strike in a single tempo; as well as their own defensive measure, the distance at which they are in danger of getting hit in a single tempo. These measures will vary depending on factors height, wingspan, flexibility, and length of sword. As well there is both what we call narrow measure (misura stretta) which is when a strike can occur without the need of either of the feet moving, as well as wide measure (misura larga) which is where a strike can occur with the movement of a single foot, typically via a lunge.
Tempo – This one is a bit tricky. On the surface tempo just translates to time. That said, the masters who wrote our founding texts didn’t have smartwatches, so the way they perceived time is a bit different than our own. So instead of thinking of things in terms of seconds as their base measurement, their idea of a tempo comes from Aristotle where he described it as the moment between two stillnesses. Without diving too deep into it, we can think of a single action (an attack or a parry) as occurring in one tempo, whereas something like a parry-riposte would be considered two tempi. The goal in fencing is always to have your action take up a proportionally smaller tempo than your opponent’s.
Structure – This one gets hinted at a lot, but isn’t always explicitly mentioned by name. Essentially this is just using proper blade and body mechanics to move your opponent’s sword out of the way so that you can strike. For instance, by bringing your elbow in so that it’s in line with your hilt and your shoulder, you can suddenly deal with much greater forces than if you chicken-wing it out to the side every time you go to parry. A lot of times this is just referred to as “technique”, but I’m going to shy away from that here as I firmly believe that proper technique is something that can describe all three of these pillars.
In essence, if you can control all three of these, any given fight is yours for the taking. There is still of course strategy, making sure that your techniques string together in a fashion that gets you where to go as well as trickery, such as in feints and invitations. That said, figuring out what strategy to start building gets a whole lot easier when you have strong, reliable pillars to build it off of.
Now that we have the groundwork established, what’s an attribute? Essentially an attribute is essentially just bonus points you have walking in that exist outside of “here’s how to use your brain well”. Lots of fencers spend their early careers relying primarily on these attributes to get them out of their pools and into later rounds. Eventually this leads to either stalling out upon discovering that the ceiling for technique is exponentially higher than it is for pure attributes, or they learn to switch to a technique based game that then has a bit of attributes mixed in to add some extra oomph.
While I’m not especially interested in attempting to lay out every attribute applicable to fencing here, there are a few I’d like to focus in on.
Height – Height is the one thing on this list that is entirely a luck of the draw. A small bit of it has to do with nutrition growing up, but even if your kid eats all their vegetables there’s still no guarantee of them growing up to be a 7ft tall point guard. Whereas other martial sports more strongly reward size (see weight classes in boxing and wrestling), fencing in particular really rewards height/reach. If your opponent is coming in on you and you have 10 inches on them, that buys you a good bit of time to think of a plan B. It also means you get to launch a lot more of your attacks with impunity as there’s a whole swath of measure where your opponent is in danger and you’re not. There’s a reason that the average worldwide height for for men is 5’6”, the average male Olympic fencer is 6ft tall. For women we see the same thing with the worldwide average being 5’2” and the Olympic fencing average being 5’6”.
Speed – As it turns out, if you can get there faster than the other person, you tend to land more touches. Part of this has to do with how familiar the actions are to your brain and another part has to do with intentionally building fast-twitch muscles. That said, a ton of how fast you can make your lunge has to do with genetics. A lot of it also has to do with age as after a certain point, we all start to physically slow down. As a result, this is the attribute that tends to peter out the fastest.
Strength – Being stronger than the other fighter matters a lot less in fencing than it does in other martial sports, but that doesn’t mean it doesn’t play a key difference. If people two have their swords meet in a bind, all else being equal, the stronger fencer is going to prevail. This means that you can get away with sloppier attacks and parries as the stronger you are, the more wiggle room you have. As well, having more musculature also means that you can hold your sword out for longer, meaning that you’re going to be able to get in more reps per hour than the fencer next to you. Out of the three attributes here, this one is the easiest to improve on. That said, even with the right training, dedication, and nutrition; a lot of people just don’t have the genetics to be champion powerlifters.
None of these attributes guarantee you a victory, but they sure make things easier. The spot I’ve seen them make the most difference, at least for me personally, has less to do with someone’s initial plan and more to do with when they suddenly need to bail out of a bad situation. Suddenly having more space between you and your opponent’s sword, being able to move where you need to be, and the ability to push your opponent’s sword out of the way suddenly make a fairly sizeable difference. That doesn’t mean that I haven’t seen people in their 70’s beat up people in their 20’s or that I haven’t seen people who were 5’4” take out people who were 6’10”, but those cases are outliers and not the norm.
Now what does this all have to do with the pillars I set out earlier? Well, it turns out that each of these three attributes maps directly on to each one of our three pillars. There is of course some amount of overlap, but this is a blog article and not a full length book (yet), so we’re only going to dive so deep today.
Height directly affects measure. The taller you are, the more measure you have on your opponent. This doesn’t mean you necessarily have any idea how to use it or a sense of where your measure is vs. your opponent’s, but it does mean you have a fair bit more time on your hands to figure out what to do before their tip comes and bops you in the nose. Now, there are definitely strategies that shorter fencers can employ to take out larger ones, but assuming that each fighter has an equal sense of measure, the taller fighter is going to walk in with an advantage. The only real benefit the shorter fencer has walking in is because fencing tends to attract taller people (because of the early success), they’re going to have to learn how to fight against tall people fairly quickly whereas taller people will likely have less time fighting against shorter folk.
Speed has a clear impact on tempo. In a match, you don’t necessarily need your sword to move at a higher velocity than your opponent’s, but you do want it to take less time on the clock to reach its objective. So if you can move faster, that inherently means that you’re going to take less time to perform a given technique. The issue here is the people who rely too heavily on their speed and never learn to tighten their motions. As it turns out, the ceiling for making your actions more economical is far higher than the ceiling for how fast you can get your hands to move. That said, if your motions can be simultaneously quick and tight, you’re going to start winning a lot more bouts.
As a slight aside, having a longer measure means that your opponent inherently needs to take a longer tempo in order to reach you. Turns out, Einstein was right on that whole space = time thing.
Finally, strength buys you a lot of wiggle room with structure. You put a top level wrestler up against a silverback gorilla and despite one having had years of intense technical training, my money is still going to be on the gorilla every single time. And that’s not just because the gorilla won’t care about the rules. Having proper structure, being able to understand how swords are just levers and that if you anle them right, they’ll do almost all the work for you is a wonderful thing. That said, when I fence people twice my size I tend not to use a lot of blade contact as if they have even a basic understanding of structure, I’m going to have an incredibly hard time trying to push their sword around.
So what are the takeaways here? First, it’s that in most cases there’s going to be a lot more room to grow when it comes to technique than when it comes to attributes. You’re not going to get taller, you can get a little bit faster, and you can get a good deal stronger. However, you can have a much better sense of measure, a far better sense of timing, and a much deeper conception of structure.
Second, we often pay more attention to those with early success as opposed to devoting ourselves as teachers equally to all those coming to us wanting to learn. If your only concern is churning out champions, that approach makes sense. However, if your goal is to grow our community, heaping all of your praise on a bunch of tall, young dudes isn’t the way to go about it. It can be really easy to take a look at who won the day’s novice tournament or to see someone in their first year and remark, “They have a lot of potential” when all it is is them walking in with better luck in the attribute department. Instead, my suggestion is to spend some more time working with those folks who you know will be there week in and week out, regardless of how well they did at last week’s tournament.
You know those times you grapple with a problem for months and then someone just drops the answer in your lap and everything is suddenly illuminated? Well let me walk you through my past two days of sword research.
This weekend I came back from Pennsic with a few things I know I wanted to work on. While I was overall happy with how I performed, the fights I had showed me what I want to work on next to improve my game because what fun would it be if I just stayed put? The top thing I came into practice this week knowing I wanted to hone even further was feints. A bit ago I published an article on how to teach feints, so I’d say I have a fairly decent grasp on the subject. That said, there’s always room for improvement.
After I wrote that article, the follow up project I had planned for that was to make a giant spreadsheet of every feint in Giganti’s first book (and possibly his second), in order to ascertain some greater pattern. This was fairly daunting and as such it remained not even half finished for months. Then, Tuesday night one of my teachers offhandedly handed me the answer I was looking for.
So as a quick recap, there’s essentially two kinds of feints in rapier. The first is a feint-direct where you throw the feint on the line you’re already on and if they respond you switch to a different line. If they don’t respond, as Giganti points on every single feint, just stab them on that line. The other option is the feint-disengage where you throw your feint by disengaging to another line and then threatening. If they respond you just go back to your original line (or do a half disengage and strike under). If they don’t? Just stab them.
My previous advice was to work through both of these both as the person initiating the play who’s finding and moving forward to start and to do both as the person responding to being found. The new thing I was just given, though, makes that whole decision tree way easier and makes the pattern of Giganti’s plates way easier to comprehend.
Previously I was able to see how Giganti wrote his first seven plays as a direct line, but things got muddier after that. I could tell that he would show a play starting on one line and then often have the next play switch to starting on the other line, but it was difficult to see the forest for the trees. Plate 1 is how to lunge, plate’s 2 & 3 are how to gain your opponent’s blade on the inside and then outside lines, 4 & 5 are how to respond to a disengage and then strike, and finally 6 & 7 are how to counter-disengage. I saw how he would teach us the response to a more advanced technique before having us do it ourselves as now how to survive anything that comes your way is more important than being able to throw a variety of attacks. From there I could ascertain that plate 8 is where he moved us away from winning purely via mechanical advantage and into the realm of feints, but after that I lost the trail.
So the piece of advice I just got, like almost all of upper level coaching, is just two general principles put together in a way I (the student) hadn’t thought of before. If you are the one finding and you want to feint, feint-direct. If you are being found and want to feint, feint-disengage. If you already have a line, there’s no good reason to leave it. You might want to test the waters before committing further down that line, but don’t leave if it’s already yours.
Something that’s both incredibly important while drilling this which will also pay off dividends by reducing your cognitive load during your fight is to decisively only offer one line or the other. If you’re setting up and want your opponent to attack to the inside, make the outside completely unavailable. As I’ve written about previously, we often end up drifting into a guardia mista, which not only makes drilling this more difficult as your partner won’t be certain as to which line to proceed on, but also makes you more vulnerable in a fight by making it so that you can’t predict where your opponent is going to go. This all applies to attacking as well as defending, but to a lesser degree as over committing and crossing your blade too far over your opponent’s makes you vulnerable to a disengage in a way that a solid, static guard with only one line available doesn’t.
Okay, back to the text. With this new piece of information in front of me, reading Giganti’s feints feels like walking out with a new glasses prescription after years of not knowing you needed an update. Plate 8 is just you being found to the inside, and then doing a feint-disengage to the outside. While this time we are the one doing the more advanced technique first, you are still the one responding to an initial threat because getting out alive is more important than coming in and steamrolling your opponent. Plate 9 has us being found to the outside line and doing a feint-disengage from there. There’s a few more complicated bits that follow from that, but the opening to each play is still following a clear order. Plate 10 starts with us coming in with a feint-direct, but doesn’t take the time to go through both the inside and outside lines. He then ends this plate with responding to a find with a feint-disengage over the top instead of underneath, but the first part still follows the pattern. Plate 11 is another one of coming in with a feint-direct, but brings in the addendum from plate 10 and has us disengage over the top.
Plates 12 through 19 are about voids and attacks that aren’t just taking the line and firing straight down the center, but figuring out a schema for those is a project for another day. As well, Giganti teaches us how to feint against a dagger on plates 33 through 35, but by that point he assumes that we already know how to feint against a sword and is just circling back to show us dagger-specific feints after having spent a good long while on teaching us how to win with the dagger via mechanical advantage as well as via invitations.
Hopefully you find this helpful in your own study of the art of the rapier, or at the very least found my journey of discovering amusing and found that it lightened up your afternoon.
Recently a good friend of mine asked for some advice on how to teach feints. Thankfully I had just spent a couple of months working on a sequence to help teach just that to one of the folks at my local practice. Please note that this sequence is set up to teach the fundamentals of feinting the thrust with a single rapier. There is of course always more to add on the subject. However, if you’re in the market for a jumping off point or just want to revisit an old topic through a new lens, hopefully you’ll find this helpful.
In essence, you break it down into a decision tree where there’s only two available paths at any point. Eventually you can add more, but getting rid of that white noise early on will make the whole process easier.
The first step is to build good lunge mechanics. Feints aren’t going to work if they’re going foot, body, sword. While there are exceptions, the standard feint is going to be sword, then body, then wait to see what your opponent does, all without committing weight onto your front foot. Only then do you get to strike.
After that, if you haven’t already, you need to build strong finding and gaining mechanics. Feints are an advanced technique and there’s a reason Giganti waits until plate 8 to start addressing them. Just like with the lunge, you need a solid foundation before you can start adding on all the bells and whistles. From the other side a feint should look just like any other strike coming in, otherwise people aren’t going to bite on them. Your opponent needs to feel threatened in order to stir up a reaction. If they don’t feel threatened, they’ll either ignore you or seize your tempo and punish you for your mistake.
The next step is to figure out which line is open. Never feint to a closed line. It may sound obvious, but you’d be surprised how many people I’ve seen just throw committed attacks straight into a closed line. Encourage your students to learn from other people making those mistakes for them. Anyhow, have them approach the edge of measure, feint to either the inside or the outside line. whichever is already open. From there one of two things will happen. Option one: their opponent doesn’t move. Giganti points this out in every single feint and tells us to just stab the person. Option two: their opponent moves to parry. In that case the response is to disengage, use the sword to close the line on the other side, and strike. There should be the slightest of pauses to see what their opponent is going to do. If they just go through the whole series of actions without waiting for a response, they are going to run their face straight on to their opponent’s sword. Far too many folks, especially on the younger end (ask me how I know), have a tendency to be too fast for their own good. Speed is a helpful tool to have, but it if it means they’re always jumping the gun, it’s going to star being a hindrance. The other common mistake here is not properly closing the new line with the sword. There is a time and a place to bring the off hand in, but that’s something you’re going to want to throw in on top of good blade mechanics, not instead of good blade mechanics.
Have them do this whole sequence on both the inside and outside lines. Lots of folks, especially right-handed fencers, only train for how to fight on the inside line. If your students/drill partners are comfortable on both the inside and the outside, they’re instantly going to have a huge leg up on a large amount of the competition. Any of your left-handed students who have been around for awhile are probably already decent at this as being on the outside line is just going to naturally happen more frequently for them lining up against right-handed fencers who want the fight to be on their own inside lines. This is also the core of the reason rapier fighters complain about fighting lefties. Unlike with longsword, the strikes aren’t all that different as most everything is just a straight thrust. It’s that beginning to intermediate right-right handed fencers aren’t used to having to close their outside lines.
After the student gets that down, change who’s approaching. So now instead of them coming forwards, it’s you who steps in to find their sword in wide measure. Once you’ve committed to that action, they feint.
Do this on both sides.
After that work on feint-direct vs. feint-disengage. For reference a feint-direct is what you have already been doing where the feint is on the line you’re already on. A feint-disengage is just feinting with a disengage. This doesn’t necessarily mean that the final strike is delivered with a disengage, just that the initial lie is given in the form of a disengage. Eventually you’ll get to adding in a second disengage or even a half disengage after the feint, but that comes later. Also, as a note, the feint-disengage is going to pop up more frequently, but I have personally found the feint-direct is easier for students to initially approach. This can vary student to student, though. My recommendation is to start with whichever one is easier for that student to comprehend. Unlike with the lunge and finding and gaining, there isn’t a hierarchy here. All that matters is getting the material through in a way that will click with the other party.
Next, have them deliver a feint disengage going from inside to outside as well as outside to inside.
With that done, now cross apply the previous part as to who is approaching and who is receiving. Once you’ve done that with the feint-disengage, you essentially build a matrix of feint-direct/feint-disengage, approaching/receiving, inside/outside.
With that done, start adding more and more actions on to the front end. It’s important to remember that the plays in the books shouldn’t be read as purely opening actions. Often-times they’re showing us a clip having started partway through the video. So, feel free to take any of the plays from plates 1-7 and then tack on a feint to the end. By burying the lead and having them throw the feint in as a later part of a sequence, it will create a safe environment to stress test their technique and force their brain to recall the technique in the midst of a mildly stressful situation as opposed to in during the quiet tranquility of feinting from stillness. Doing this will help to bridge that gap between tightly prescribed drills of one to two actions and the chaos that is the fight itself. I have seen too many schools only drill short, scripted sequences and then when their students go out into the larger world, they wonder why it is they’re getting smoked by people who seemingly have worse mechanics than they do.
It’s this last part of the progression, adding things in before the feint itself, that tends to trip people up. Often-times folks will try and feint from stillness during a fight, because that’s what they were taught to do during drills, and then get frustrated that none of their feints are working (the other reason is bad mechanics, but we already covered that). Approaching any technique in a vacuum is a helpful way of refining the mechanics needed, but it’s important to remember that mechanics alone are not the whole picture. A feint, unlike finding and gaining, is at its core a psychological trick. The dumber we can make our opponent be, the easier it becomes to pull the wool over their eyes. The way we do this isn’t by putting something in their drink, but is instead by overloading their brain. The further down the decision tree we get, the more fatigued our minds become. The more fatigued our minds become, the less intelligent they become. So that means that the best time to throw a feint isn’t at the outset when your opponent is standing there at full capacity. Instead, it’s a couple moves in when folks are ready to jump at anything that moves.
The important themes here are: 1) Proper lunge order/mechanics. 2) Having to pick from only two options at any time, which are dictated by what our opponent does/doesn’t do. 3) Understanding that people get dumber the further down the decision tree they get and using that to our advantage.
It all boils down to, “Did they not move? Stab them right there.” “Did they move? Stab them somewhere else.” There’s a reason Giganti puts that warning on each and every feint.
Bonus lesson!
Did you both make it through that whole progression and are hungry for more? Wonderful, I now have a justification for all the sword books I keep getting for Hannukah.
The short version is that now you’re going to start tacking things on to the end instead of the beginning. So, if you open with a feint-direct, have the other side move to parry both the initial feint as well as the strike coming off the disengage on the new line. Then, as they go to parry your second motion, just disengage back and strike them on the original line. On this one, as well as on the standard feint-disengage[1], it will help to make that first disengage a bit wide with your tip pointing outside of their silhouette. Especially if they’re already relying on their lizard brain to react at this point, going wide will cause them to parry wider than normal, leaving a nice open window for you to enter through. The only reason this works is because you’re getting them to make a mistake in a way in which you can predict from the get-go. If you just start throwing attacks wide, they’re not going to work.
If your opponent is especially fast, though, and you can’t seem to find the time to get through the entirety of that second disengage, there is another option. After your first disengage, instead of drawing a half circle on the way back, just draw a quarter circle and slip your blade underneath your partner’s hilt.[2] Unless you feel like dropping your body really far down into a passata sotto, my suggestion would be to bring in off hand and place it on either their hilt or their forte. This one also tends to work better with a pass than with a lunge.
For furthering reading, here’s the link to the free online translation of Giganti’s text. A book that, in my opinion, is the most easily approachable of all the period fencing texts. As well, everything I that I covered today can be found in the first ten plates of his work.
After almost two years, I was finally able to put together a full video for all of the plays the Anonimo gives us for his sword in two hands. Feel free to give it a watch here:
For my latest project I decided to read the entirety of the Anonimo Bolognese from cover to cover. This is intended as the first article of many in my explorations. For those unfamiliar with the text, the Anonimo Bolognese is a compendium of two overlapping, handwritten manuscripts written some time between 1500 and 1550 currently stored in the Classense library in Ravenna, Italy. It covers a large array of weapon forms and lines up with much of the teachings of the other Bolognese fencing texts we currently have. While the text comes to us without an author or any illustrations, I have found it to be one of my very favorite fencing manuals and hope that this series will help some of you to think the same. With that said, let us begin.
After laying the groundwork by giving us all the vocab for the various guards, cuts, steps, tempi, etc.; the author of the text lays out for us his philosophy general of fighting before diving in to the specific plays. This is a pretty rich ten-page section, and I in no way intend to rewrite the entire thing. Instead, I wanted to draw your attention to a few key pieces.
In the first part he tells us that we ought to walk out on to the list field in a manner that will scare the ever-loving bejeezus out of our opponent. He doesn’t want us to let our opponent get cocky and then capitalize on their mistakes. No, he wants us to have already won before the fight even begins. Specifically, he says to, “Move in such a way as to give him the impression that every gesture from you carries the potential for inflicting a crippling wound. Make your attacks so cruel and violent that even the slightest blow is enough to fill the opponent with dread.” [1] Sometimes in our modern context we can easily forget that these arts were created by and for people who put their very lives on the line, both in duel and in battle. These days, any high intensity match I end up having is likely going to be with somebody that I’m already friends with and then afterwards we’ll go out and have a beer. I can afford to make mistakes and let my opponent feel confident enough to bring their best game. In fact, I’d prefer if they do. I don’t want to win because somebody was having an off day, I want to win because I trained harder than they did. But if it was my life on the line and not just a medal? You bet I want to bring everything to bear I possibly can in order to scare my opponent into making mistakes.
On the flip side of this, there is an important lesson here that does translate to our modern tournaments. Have you ever showed up to a tournament, seen them call out the names for who was in each pool, and seen someone visibly deflate at the sound of someone else’s name? Well, the Anonimo is teaching us here not to let that be you. Even if the person who’s name has just been called has beaten you left and right every time you’ve lined up, don’t resign yourself to getting second at best just from the get go. That’s just making their job easier for them. They might still end up winning, but it’s important to make them work for it and not let them play mind games with you.
Looking ahead a few pages, the author gives us yet another gem. He instructs tells us that it, “Often happens that one fighter will be graceful and polite with the sword in hand, yet nevertheless it does not serve him well when he finds himself against another fighter who fights brutishly with the sword. And so, the graceful fighter upon coming to grips with one that fights brutishly does not perceive that the brutish fighter will come out on top, because the brute cares only for utility and does not give a damn for beautiful play as his mind focuses upon only what will work and dispenses with all pompous plays.”[2] Now, for all my rapier fighters out there it is important to note that the Anonimo’s brutish fighter is not the same as Capoferro’s “bestial man”. What he is describing is not someone who fights without proper form and thus launches attacks that more classically trained fighters won’t see coming. Instead, what he is describing is a fighter that is concerned just with winning the fight and as opposed to primarily being motivated to enter the ring by the crowd of ladies gathered just outside *cough* Marozzo *cough* *cough*. The Anonimo goes on to warn us that the brutish fighter, due to their lack of aesthetic movement, will likely be seen beforehand as less likely to win than the graceful fighter. If anyone has ever read/seen Moneyball you’ll see that we still do the same thing today with professional athletes, often overlooking someone’s actual record in favor of focusing on their presentation.
For out last section for today, our author goes on to describe for us nine ways of moving. We can move forward while “attacking brutishly”, purely defending, or while both defending and attacking. Next, we can move backwards while hand sniping, playing pure defense, or to do both. Finally, we can stand firm while throwing continuous attacks, doing nothing but defending ourselves, or to employ both.[3] While it may be instinctual for us as readers to think that moving while simultaneously attacking and defending is always the best option, the author goes on to tell us that all nine options can be done artfully. Instead of going through the ups and downs of each and every option here, I am electing instead to leave that part to you my dear reader. Hopefully you will find value in the exercise and will come back to read what I have to say next.